Imagine having a small world, a miniature forest encapsulated in glass, pulsating with life on your bookshelf. An ecosystem that takes care of itself, where water dances in a perpetual cycle of evaporation and condensation, nourishing the plants without you needing to lift a finger. It sounds like magic, but it’s science, and it’s easier to create than you think. Forget the idea that gardening requires constant effort. Today, you will become the architect of a living jewel, a piece of art that breathes and evolves. With just six steps, we will transform glass jars and a handful of soil into a self-sustaining universe that will captivate all eyes and bring a green tranquility to your daily life. Prepare to be amazed at how simple it is to bring your own eternal garden to life.
Step 1: Choosing the Perfect Container. Your terrarium begins with the home you give it. Look for a clear glass container with a tight-fitting lid – it could be an old canning jar, a candy dish, a demijohn, or even an aquarium with a custom lid. Transparency is crucial for photosynthesis, and the seal is what makes the system self-sustaining by trapping moisture. The size and shape are a blank canvas for your creativity, but remember that containers with a wider mouth make the assembly process and plant placement much easier. Wash it well with soap and water and dry it completely to ensure no unwanted residues join your new world.
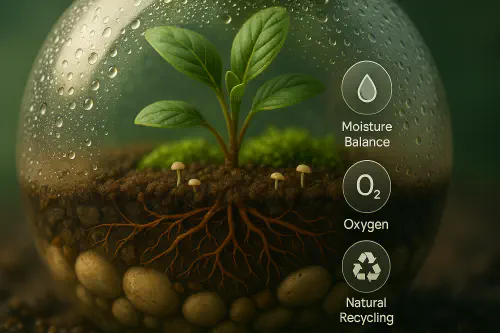
Step 2: The Fundamental Drainage Layer. No ecosystem thrives in a swamp. Since your terrarium won’t have holes to drain excess water, a drainage layer at the bottom is the secret to preventing your plant’s roots from rotting. Create a base of about 2 to 3 centimeters of gravel, river pebbles, expanded clay, or even ceramic shards. This layer will act as a reservoir, keeping water away from direct and constant contact with the roots, allowing the soil to remain moist but never waterlogged. It is the invisible foundation that ensures the long-term health of your glass garden.
Step 3: The Guardian of the Ecosystem, Activated Charcoal. This is the step that many beginners skip, and it makes all the difference. Over the drainage layer, add a thin layer of activated charcoal. You can find this at garden centers or aquarium supply stores. Activated charcoal is a prodigious natural filter. It purifies the water, absorbs toxins and odors that can develop in the closed, humid environment, and prevents the growth of mold and bacteria. Think of it as your terrarium’s immune system, working silently to keep everything fresh, clean, and in perfect balance.
Step 4: The Substrate, the Soul of the Garden. Now it’s time to give your plants a nutritious home to set down their roots. The choice of soil is vital. It needs to be light, airy, and retain moisture well. A mix for tropical plants or African violets usually works perfectly. The ideal amount is a layer at least twice the height of your drainage layer, ensuring enough space for root development. If you want to take your project to a new level of excellence, you can even prepare your own mix. There is a real secret to the perfect potting soil with a homemade recipe that can completely transform the health of your plants. Shape the substrate, creating small hills and valleys to give your miniature landscape a more natural and interesting look.
Step 5: The Stars of the Show, the Plants and Decoration. The most fun part! Choose small plants that love humidity and indirect light. Fittonias with their colorful, veined leaves, small ferns (like maidenhair), various mosses, marantas, and mini-orchids are spectacular candidates. Carefully remove them from their original pots, shake off the excess old soil from the roots, and, using long tweezers or chopsticks, position them in your scene. Start with the largest plant and then add the smaller ones around it. Leave space for them to grow. Once the plants are in place, add decorative elements like stones, small branches, shells, or miniatures to create your dream landscape. Moss is perfect for covering the soil and giving a professional, lush finish.
Step 6: The First and (Almost) Only Watering. With everything assembled, it’s time to activate the water cycle. Use a spray bottle or a syringe to add water slowly, aiming at the sides of the glass and the base of the plants, until you see the drainage layer become damp, but not flooded. The soil should be well-hydrated, but with no puddles. Less is more here. After watering, wipe the inside walls of the glass with a paper towel to remove any dirt and ensure a crystal-clear view. Now, close the lid. Place your terrarium in a location with plenty of indirect light, but never in direct sun, which would cook the plants. In the first few days, observe the condensation. Ideally, the glass should fog up a bit during the day and clear up at night. If it’s constantly foggy, open the lid for an hour or two to let the excess water evaporate. If there’s no condensation, add a little more water. Once the balance is found, your work is done. You have created a self-sustaining world.
And that’s it. You have not only assembled a decorative object but a piece of living art, a fascinating testament to the resilience and beauty of nature. Now, sit back, relax, and watch your own private universe flourish, day after day, in its perfect, silent cycle.
Use the share button below if you liked it.
It makes me smile, when I see it.